
CBD | P4 | AS 4: Altered book
- Amber Houbara

- Jul 9, 2022
- 6 min read
Using a found book, significantly alter the appearance of the pages to create a new volume that is personal to you. This can be any kind of book that is of interest to you. For example, a fiction book, a non-fiction book, a picture book or a photo book.
Approach the found book in a very physical way, manipulating the pages and paper inventively. If you need to, stitch or glue a number of pages together to reduce the ground you need to cover. Decide what to remove from the book, and what to add. Use the found book as a source of ideas and inspiration – the existing text may inspire illustrative, conceptual images, collages or typography as image. Embed, overlay and integrate your work into the existing pages using whatever materials, media and processes you feel necessary. This may be digital, hand-rendered, photographic, textile, or a combination of all these and more.
Think about the relationship between the content and the form, the design (text and images), the materials you use, such as papers. Perhaps you are creating a new sequence within the book?
Change the book from its original form into a different form, altering the appearance and/or meaning. Apply an inventive, intuitive response to materials and how these can be exploited within the context of the altered book.
Refer to your contextual research into artists and designers in the unit so far. Use elements of your research as inspiration and to inform your book-altering practice.
Reflection
Write a paragraph reflecting on the assignment and reflect on your process and
decision making. Are you looking in a different way to meaning, materials, design
and the form of the book?
Now is the time to take a good look at the assessment criteria in the introduction and make sure that your work meets the standards set. Ask your tutor whether they think you will be ready for assessment at the end of the course and what you need to improve upon.
To start with, I wanted to research this mix media genre, as I thought I am not familiar with it.
So I had a good look online and on Pinterest and realised I did know this kind of mix media, and saw it in Museums Galleries and online.
Even though I did come across this media, I was still so not familiar with so many beautiful techniques and ideas I saw on my research.
Usually when I am not familiar with a genre or a technique I go to Skillshare to see if there is any course I can take.
I have found this special course which is also a staff pick, of this really beautiful artist of altered books. I fell in love with her work and I really liked how she simplified the process. So I ended up doing the course in one breath.
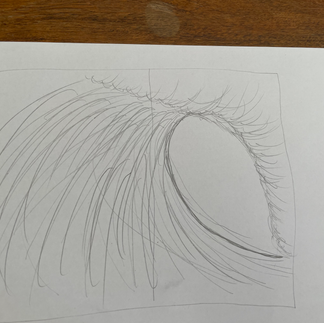
I really was intrigued to create my own altered book now and I loved this technique she was presenting. I thought a drawing of a barreling wave would be so beautiful as it has such depth and it is so beautiful.
I started looking at photos and drawings of waves, as drawing is my less good side, I had to get inspiration and study how the wave really looks like when barreling.
As a surfer, I spend a good amount of time in the ocean looking at waves, so I have a good idea, but I never have experiencing riding a barrel so I don't know how it looks on the inside of course. But I did feel like I have an advantage of being so much in the water for the whole drawing and colouring experience.

Picking a book & Gluing
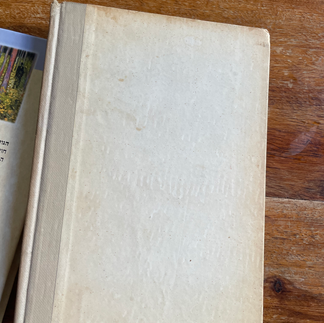
I went to 2 different second hand book stores after I couldn't find a book I wanted to carve at home. I wanted a small book, around roughly 100 pages, not to slim so I have enough room to work on, and of course with a hard cover (and also a good shape).
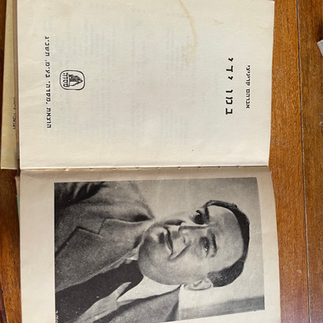
I have found this old hebrew book in the second book store I went to.
I started glueing, I had to first mark every 5 pages so it will be easier to glue, and then use a glue stick to glue each paper to another. creating groups of 5 pages.
It took a few days, as I had to glue about 3 groups and then put a band on and a heavier book on top to dry. Then when I was done with all the groups, I have to leave it with a heavier book on top for 2 extra days to dry properly.


Sketching
I wanted to work on my drawing so I did these 2 tutorials of wave drawing.
I started by sketching my wave on a paper and planning my work, while also practicing my wave drawing. I also panned the depth and colours I wanted to use.
I have transffered my sketch into my book, and had to try few attempts and erase. Once I trusted myself and stopped looking at the tutorials and images on the computer, I just let my hand free and then I felt like I'm actually achieving what I wanted to do. It was a nice feeling.
Then I traced it with a black pen, the tutorial suggested 0.1 but I have found at home 0.38 and thought it will still be ok.


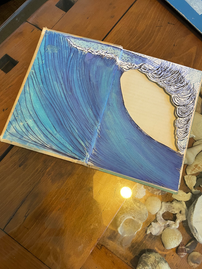
Colouring
I started with my watercolours, the tutorial suggested to use watercolours just as a very light background for the coloured pencils.
Watercolours were never my strong side, so I was really not in my comfort zone at this stage, I mixed my white with water and started to paint while the white started mixing with the ink of the pen and created blue where the foam is. I was really annoyed by it and had to think what to do in order to fix this.
I used a white pen to colour all the foam parts, I had to go carefully and slowly in order to not mix the white pen with the black pen as this too created a blue colour! So I had to go with the pen between the lines.

When I started mixing and colouring with the blues, again, the black ink got mixed and created shads of purple and I had to go again and mix it until I got the shades I wanted. The watercolour became way too dark for what I was trying to achieve (according to the course) but I liked the colours so I decided to not work with the coloured pencils and only keep working with the water colours.
Once my first layer was done, I started carving, each layer had to be carved twice to create depth.
Even though the course said to do each layer and then carve, I wanted to carve first so when I add the colour I can control the depth.
I added and mixed colours such as blue white green and light blue to create turquoise, and at the very end some black for shadow (from the lip of the wave).
Eventually, I wanted to add more white and create a texture of foam, so I decided to use acrylic and a piece of seaweed to create some texture and more white (to fix the initial problem with the blue), i was very happy with my result!
I liked how the letters also used as the wave shadowing instead of drawing more lines.


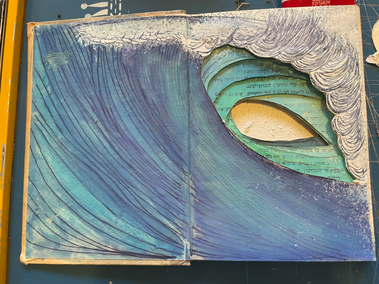


Final Work


Reflection
I am very excited about this assignment and how it came out. I won't lie I was nervous (especially with the watercolours) and I was not loving my work during the whole process, as it is a big thing for me to work with my hands and drawing in particular. But I feel like I came a long way since the beginning of my time at OCA, and I was pushed beyond my comfort zones and therefore I was very enthusiastic when I read the assignment at first and I am very happy with my result.
I think I am improving, and my work is getting better and better, as well as my technique.
I liked how I solved the problems that arise such as the white getting mixed with the black and such as the water colours being too strong, and added more elements I didn't think I will use such as acrylic and seaweed (by the way, a small piece of seaweed got caught up inside the white foam texture in the background and I liked it so I left it there!).
In total I think this work and other works I've done on this course are good for assesment.


Comments